

Many of your tools are made to order, and this can take time. Although most orders are shipped within 1 week, some may take a little longer. Approximate USPS shipping times are in addition to the time it takes to make and process your tools.
Shears date back to Mesopotamia 3000 to 4000 years ago and were made of bronze. They looked like sheep shears or jacks with sharp blades. The Roman’s improved on them around 100 AD, they moved the pivot from the back of the shear to the back of the blade. In 1761 Robert Hinchcliffeof Sheffield England started the first production of scissors we know today. If you want to learn more check out Wikipedia for more information and photos.
The Roman innovation of moving the pivot to the back of the shear blade changed everything. Scissors gained mechanical advantage some thing they did not have before. Mechanical advantage is where the users applied force compressing the handle is compounded in the shear blade. A simple way to calculate mechanical advantage is to devide handle length by blade length. So my trim shears have a handle length of 6.5 inches to the bolt hole and the blade length is 2.5 inches to the bolt hole (6.5 divided by 2.5 equals 2.6). The shears have a mechanical advantage of 2.6 to 1. If you squeeze the shear handle with 10 pounds pressure the shear blade will have 26 pounds of pressure. This tremendous amount of force applied to the very small cutting edge on the shear allows the shear to cut through glass with little effort, a longer handle will have more mechanical advantage and a shorter handle will have less. As shear blades get longer mechanical advantage is lost. Check it out by getting some thick paper, the further you cut from the scissor pivot the harder it is to cut the paper.
Shearing Glass
So what is happening to the glass when it is being cut with shears. The definition of shearing is “to break or cause to break owing to structural strain”. Cut paper with scissors and you can hear the paper ripping “structural strain” between the blades as they are closed. When glass is a liquid it has no structural strain but once it cools the shearing definition applies. Glass cools from the outside in creating viscous skin with a soft core. With a diamond shear or straight shear the glass is pinched between the blades. The soft glass is pushed aside leaving the viscous skin to cut. If the glass is hot the viscous skin is thin and the cut is clean. This is where mechanical advantage becomes important because cutting cooling glass takes a lot of force.
With each cut a small amount of glass dust is produced that is drawn between the shear blades. It is the ground glass that abrades the inside of the shears dulling them. Once a shear gets dull it will produce poor cuts and creat more glass dust and subsequently more abrasion of the shear blade. This viscous cycle leads to worn out shears and poor cuts. Yet the shears will keep cutting as long as they can break through the glass..
Shear Problems
I regularly see problems with shears that can be easily corrected or avoided. A common problem is the shear has been reassembled improperly and the blades bind or get loose randomly. This problem starts when the shear was disassembled and reassembled incorrectly.
Shear Assembly
When the shear is dissembled look at the blades one blade will have a smooth hole in it and the other blade will have a hole with threads in it. The correct way to assemble the shear is put the bolt through the hole in one blade and thread the bolt into the other blade. Put the nut on the end of bolt that is sticking out of the blade. Now that the shear is assembled correctly it is time to adjust it.
Adjusting Shears
Now that the shear is assembled correctly tighten the nut until by hand until the shears go have right amount of tension. Lightly tighten the nut with a wrench and check to see if the tension is correct. If it is too tight loosen the bolt or if it is too loose tighten the bolt while keeping the nut lightly tightened. Keep moving the bolt around until you get close then tighten then nut some more. Keep repeating this process until the shear has the right tension and the nut is tight. By tightening the nut the bolt will be locked in place and the shears will not come out of adjustment.
If your shears are loose then they are not cutting as well as they might. This leads to poor cuts and blade wear. It is a good idea to occasionally make sure that all of your shears are adjusted correctly. When you are doing this blades can be inspected for wear and sharpened. Another thing do is to put a drop of oil between the blades by the bolt. This will make the shears close easier and have better action.
Sharpening
Sharpening shears is not that difficult if you have the right tools. The shear blades are harder than a file so don’t bother. I would stay away from belt sanders and grinding wheels because it is too easy to remove to much material from the shear blade. It is also difficult to see what you are doing. I prefer to use a diamond hone for general maintenance. If the job is too big for a hone then I prefer a angle grinder with a sanding disk on it. Try to keep the cutting edge “micro bevel” to 1/16 inch with the big bevel “macro bevel sloping away from the micro bevel at around 50 degrees
Rust is the most common problem people encounter with my tools. Most of the tools are all made of high carbon steel, which will rust if given a chance. If you live in an area that is humid or by the ocean the problem is much worse. If your tools are rusty or thinking about it you should try to stop the rust.
What I recommend is to wipe the tools off with a cloth that has your favorite type of oil worked into it. This will coat the tool with a thin layer of oil and remove some of the salts and oils left from your hands. Between the cleaning and oiling this should solve most of the problems.
If you have a situation where the rust is very difficult to control there are other solutions but they will change the appearance of the tools. One option is to paint or patina the tools. I have never liked painting so my preferred solution is to patina. The simplest way is to take the rusty tool and lightly Scotch Brite it and wash it off with water. Do not make the tool shiny, just remove the loose stuff. Once washed and dried the rusty areas should be black and ready for a coat of oil. The black oxide left on the tool is porous and will absorb some of the oil creating a stable finish. The tool will eventually turn black in the areas that are prone to rusting. Wiping off your tools with an oily cloth when you are done using them is a good habit to get into.
Always store tools (any tools) in a warm, well ventilated place. I know many people who keep their tools in suitcases, canvas bags or metal toolboxes, if there is any humidity they will sweat and rust. I think they are a great way to carry tools l but when you get home open the box up and let the air circulate around the tools. I think the best thing to do if you have the room is to oil the tools when you are done and hang them on the wall.
Brendan from Aethic Glassworks made a video of cleaning up his long neglected jacks. Check it out HERE.
- Make sure that the tools are dry before you pack them away.
- Wipe them down with a clean cloth or one preferably one with your favorite oil worked into it.
- Store in a warm, well ventilated place
- Look at your tools occasionally and check for wear, damage or rust. Check to make sure shears are sharp and adjusted correctly. Don't put off maintenance - it just makes your job harder.
- Mark your tools so you can identify them from five feet away. Engraving your name or initials is also a good idea. You and the people you are blowing with need to be able to identify each other's tools easily. This will keep tools that look a lot alike from wandering off. Colored tape placed strategically on the tool is the best idea that I have seen so far. Good electrical supply stores have some nice colors.
I remember my first parchoffi and I even remember making it. I had lots of ideas for it but I quickly ran into trouble. The first thing I did was burn some bad notches in the sticks while trying to make some bowls. I think that I did not soak the sticks in water long enough because they burned so easily but they were still really stuck in the parchoffi. So I set it off in a corner to dry out. A few days later the sticks fell right out and I put the sticks back in water and my new parchoffi back with my tools. Once the sticks quit floating I took them out of the water and carved them down until I could just push them into the parchoffi handle. So the next time I used them I rotated the sticks and moved the notches so they were out of the way. There are real benefits to setting up your parchoffis this way, the handle will never rust and the sticks can be replaced any time.
The next problem was the marks that the parchoffi left inside of the bowls I was making. I was using translucent colors at the time and I could see the groves that were left where the sticks had been. So someone told me to wrap some newspaper around the sticks and get it wet. The newspaper can be held on the sticks with a twist tie or wire where the parchoffi meets the wood. Not so wet that it would drip because that could check the glass. With the paper on the sticks there were no marks and all I had to do was keep it wet. If you use paper the type of wood in the sticks does not matter since it is not in contact with the glass. This is more work but I think aesthetically well worth the trouble.
Some time later I picked up a job at a glass studio where they made glass lamp shades. Each one had to fit into a brass cap and was held in place by three set screws. The tricky part is sizing the top of the shade too big or too small it is a second. Parchoffis were the answer to the problem. Instead of sticks there were two flat blades with a hole cut in them that as the proper size for the shade to fit into the cap. Once the shade was formed the last thing to do was to size it with the parchoffi, then it was puntied up and opened.
One other interesting I have seen done with a parchoffi is rolling on bubbles to make a grawl blank. The parchoffi was outfitted with paddles that were about three inches across and six inches long. Once the bubble to be rolled on was stuck to the bubble on the pipe it was opened just enough to get the parchoffi inside. The parchoffi was inserted into the bubble and the pipe was turned. With pressure on the parchoffi the wood blades rolled the bubble on with little problem until the bubble was about a third of the way on. The job was finished with a parchoffi with round sticks. This was a two person job but it sure made the process look easy.
And finally a quick word about graphite. Graphite is great stuff - it will not leave scum but it will draw a lot of heat from your glass. The common problem with graphite is it will chill the surface of the glass and cause surface checking. The most common place for this to happen is where the glass is thin like on the lip of a vessel or on a corner of a cast foot. Graphite is brittle and soft so you will be lucky if you can drop it more than once.
Wonder blocks come in a wide range of sizes to create spheres from the size of marbles to large paperweights. All of the blocks have the same hemisphere shape (half a sphere). Each block has an appropriate sized notch in it to allow easy blocking. The all steel construction will not change size shape, guaranteeing consistent results over time. A 3/8 nut is welded to each block, allowing for easy removal of the handle. Round aluminum handles must be purchased separately along with cork powder and mold glue.
The wonder block is best suited for situations where consistency of product shape and size are important. The wonder block is a finishing tool and is not a substitute for a traditional block. Do not use the wonder block to shape or cool glass straight out of the furnace. This will scorch the cork and cause the glass to stick to the cork. This will not ruin the block, but the cork will likely be damaged and the glass will have imperfections in it.
Mr. Wizard corks all of the blocks that he sells. Take a good look at it before your use it. This is what it is supposed to look like when you are done corking it. The corking instructions are straight forward, but like everything a little practice goes a long way.
So you have thoroughly scrutinized the wonder block. Now it is time to burn it in. Just like with wood blocks, wonder blocks need to be burned in.
Gather some glass, enough to fill the wonder block, block it with a wood block and then with a wonder block. It will quickly burn into a smooth block that is ready to go.
The wonder block is used in the final shaping of the paperweight. After the final gather has been blocked, a jack line is cut into the glass. This will determine the volume of the paper weight and facilitate in the blocking with the wonder block. The wonder block is dipped in water to moisten it so that the glass will not stick and this also extends the life of the cork.
Once the glass has the correct shape the paper eight can be fire polished. If minor reshaping is required the wonder block can be used dry. Using the block dry will avoid causing chill marks and produce a nice finish that is easier to fire polish.
This is my take on the wonder block, Mr. Wizard said that is sounded good, so if you have any questions or comments I would appreciate hearing them.
The cork I sell can be used on any metal surface. For example, the inside of a pipe can be corked and used as a mold. The old cast iron molds that are available on eBay should be corked. A corked mold will produce a product that is free of chill marks and surface defects. The cork is only used on molds where the piece is turned. Sharp angles inside of the mold will burn out quickly.
It is the moisture that turns to steam that protects the cork. Make sure that all vent holes are open after corking, so that the steam can escape and allow the glass to fill the mold completely. There are different sizes of cork powder. Coarse powder seems to work well in wonder blocks, while the finer cork should be used on closed molds.
Try to keep the cork moist. This will make the cork last longer.
Mr. Wizard's Corking Instructions
-
Brush on even coat of linseed oil.
-
Dust on cork, shake off excess.
-
Bake at 500° for 45 minutes.
-
Repeat steps 1-3
-
The cork will eventually burn off the mold and will need to be replaced. Heat the block or mold to 700° and reduce the cork on the block mold to ash. Remove all loose material and you're ready to recork.
Long ago in the nineteen eighties there was a monthly news letter called the Independent Glass Blower published by David Gruenig. In one of the issues a ring tool was discussed. It seemed like such a good idea that I had to make this tool.
The ring tool is used like a bottomless block, but only after the glass has cooled off a bit. The idea is to get your art marvered into a glass cylinder and round the end. Set a jack line into the cylinder to determine the size of the marble. Heat the glass back up and use the ring tool like a block, waxing it regularly like you would a jack blade. If it starts to squeak try flipping it over because the wax has run to the bottom side, or dunk it in water and re-wax it. Be sure to rock the ring tool over the top of the marble to remove any blocking lines left from the tool. Reheat and jack on the neck of the marble and block with the ring tool. Repeat this process until the neck is small enough to be finished, fire polish one last time and knock off. At this point the marble can be torched and the neck melted in or annealed and cold worked later
Our ring tools come in size 0 through six, and will make perfect spheres from 1.25" marbles to 3.5" paperweights.
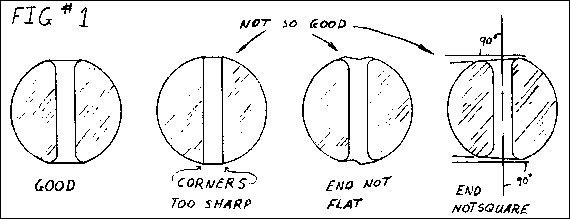
I have spent some time working with the riveter and I have some information that you might find useful. Wearing safety glasses is a good idea because beads can break and you might get glass in your eye. I have put caps on beads and have put silver rivets directly onto the beads. Putting caps on is much easier because the shape of the hole in the bead is not as important. If you want to put silver rivets on beads the bead must be shaped correctly or they will chip or break when the rivet is set, this is where the safety glasses come in. The bead must be smooth and square to the hole so the silver can be worked smoothly onto the glass. Also the hole should have a pucker rolling out to the bead (Fig. #1 shows beads cut in half to show the mandrel hole). A square hole or one that is not round will be very difficult to set with out damaging or destroying the bead.
Capping beads is a simpler process because the shape of the hole is not as critical. The hole in the cap is critical and should not be too large. The tricky part about capping and riveting beads is how much tubing to use. Too little and you will not be able to set the rivet. If you use too much there will be excess silver that you will not be able to get the silver rivet to lay flat on the cap. Determining the proper length is a trial and error process but it did not take me long to figure it out.
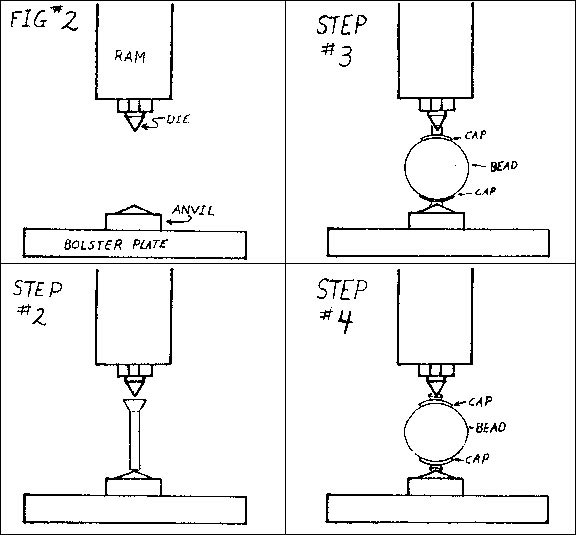
Capping and riveting beads is a two step process, flaring the tubing and then setting the rivet. The press is very good for flaring tubing and I have used up to 1/2" inch tubing with no problems. The press has an anvil, the bottom piece with the low angle cone (Fig. #2) This cone makes sure that the tubing is aligned with the die. The die is the top piece and does all of the work and can flare tubing up to 3/16 outside diameter. Watch the top piece when flaring the tubing and making sure that the ends of the flared tubing are symmetrical.
The process is as follows:
- Cut tubing to proper length about 1/16 for each side of bead in addition to the width of the bead. Be sure to de burr the tubing before riveting. If the tubing splits when riveting it was cut too long. I buy my tubing from Rio grand and Metaliferous.
- Place tubing between the die and anvil in the press and pull down on the lever until the top die flares the tubing. Make sure it flares it enough so that the caps or bead to be riveted will not fall off of the flared end. (See Step #2)
- Put bead or caps and bead on tubing with the flared end down back in the press. Repeat Step #2. Make sure both ends are flared evenly by placing the smaller end of the rivet pointing up in the press and pulling the lever making it larger. (See Step #3)
- Stop when the tubing starts to get tight. If you keep pressing the bead will chip or break. (See Step #4)
The tubing (rivet) is flared and it is ready to be set. What I mean by setting the rivet is that the silver tubing needs to be pounded down onto the caps or bead. This tightens the rivet so that the caps and tubing will not spin. Also it makes a nicer transition between the rivet and the bead, this will take some practice. You have to hit the rivet hard enough to get the silver to bend over and lay flat on the bead or cap. Too hard and the bead will be damaged, this is where the length of tubing comes into play. The right amount of tubing will be pretty easy to pound over but too much or too little is a real challenge. The thinner tubing it seems to be easier to bend over. Also going back over the ends of the rivet and polishing them will soften some of the sharp edges. Using small hammers and supporting the bottom of the rivet when pounding on the top seems to set the rivet nicely. This is a process that will take some time and effort to master. Not only with flaring the rivet and setting it but also in making the correct shape of bead.